Repurposing from Bed to Christmas Manger: Here’s Your Crib Sheet on How to Do It
Have you ever thought about making your own Christmas manger?
Let’s face it, Christmas decorating in general, has really gone downhill. People start too early, go overboard with a lot of random decorations all over the place, not to mention an over abundance of those cheesy-looking huge inflatables (its okay if you have young children!).
As a counter-cultural witness to what Christmas is really about, a simple life-sized manger with a spotlight on it, makes a wonderful and tastefully simple Christmas decoration and reminder of what it is really all about.
What is a manger?
We all have seen Christmas mangers during the Christmas season, but what is a manger, actually?
According to the dictionary, a manger is a “ low, open container which cows, horses, and other animals feed from when indoors. This is what the infant Jesus was placed in. The King of heaven!
If you can’t find the Christmas manger you want, make your own
A quick search of the internet did not turn up any affordable and realistic looking mangers, so I decided to make my own diy Christmas manger, and show others that it really isn’t that difficult, in hopes that others will make on and this becomes more of a thing.
Some ideas on how to feature mangers include anything from simply putting it in the center of your lawn with a light on it, to including it as part of a giant advent wreath display, to going to a whole another level, and creating a whole nativity scene.
If you are part of a church or have a large home, you might find a way to use it indoors as well. The finished product using my measurements is 2 feet long, by 28 inches, high by 28 inches deep.
DIY Christmas Manger Materials
The most important materials involved obviously involve the wood. As it just so happens, an old bed box spring frame provides the perfect source for the wood.
How often have you seen an old box spring just sitting at the street? No need to go buy the wood–just find an old box spring. Box spring wood is ideal because it is light and dense yet strong.


Additional Materials needed to make the Christmas Manger
- old bed box spring (ideally twin-sized), OR just buy the wood (see dimensions below)
- sharpies
- (4) 1.75 to 2 inches bolts with nuts (or wood dowels for a more historically accurate look)
- sandpaper and/or steel wool
- wood stain or weathering-effect paint
- brown and or black painters caulk
- duct tape
- lacquer sealant topcoat or aerosol wood sealer (optional)
- wood glue and clamp (maybe, if any wood splits)
- a bale of straw (pet suppliers sell timothy hay or straw in a smaller, more convenient size)
- spotlight or a light to put inside (optional)
- a Baby Jesus bambinelli figurine and swaddling cloth (optional)
Tools needed
- Conventional or circular saw
- Power drill and bit
- Breaker bar/claw hammer
- Screwdriver
- (4) clamps (or make due with something else)
- Paint brush (or rags for staining)
STEP 1: MEASURE THE WOOD FOR THE CUTS
Remove any remnants of the box spring such as protruding staples and nails if you haven’t already yet. Be prepared. This is the most tedious part–expect to take out about 100 staples which may take an hour or so.

Go over the wood with steel wool or sandpaper to smooth the surface, and eliminate splinters from handling the wood.
Some roughness is okay but make sure the top pieces of wood where you will grab it are smooth. Then measure out wood and mark with a sharpie or pencil.
STEP 2: STAIN OR PAINT THE WOOD
I think its easier to stain all the wood first and then stain the cuts edges and hidden surfaces after final assembly.
Obviously you may decide to stain everything after it is cut or after final assembly.
Once the stain is dry, add caulk to fill in the nail holes and other major defects in the wood. I think its best to give the wood a second stain coating given you are working with raw unpreserved wood and you don’t mind some aging, but also want to protect your manger somewhat from rotting.
Apply the stain and caulk heavy on the wood that will serve as the bottom of the feet. This part of the wood will get the wettest and will need the most protection.

STEP 3: SEPARATE AND CUT THE WOOD
Carefully separate the wood using a breaker bar, hammer claw, screwdriver etc.
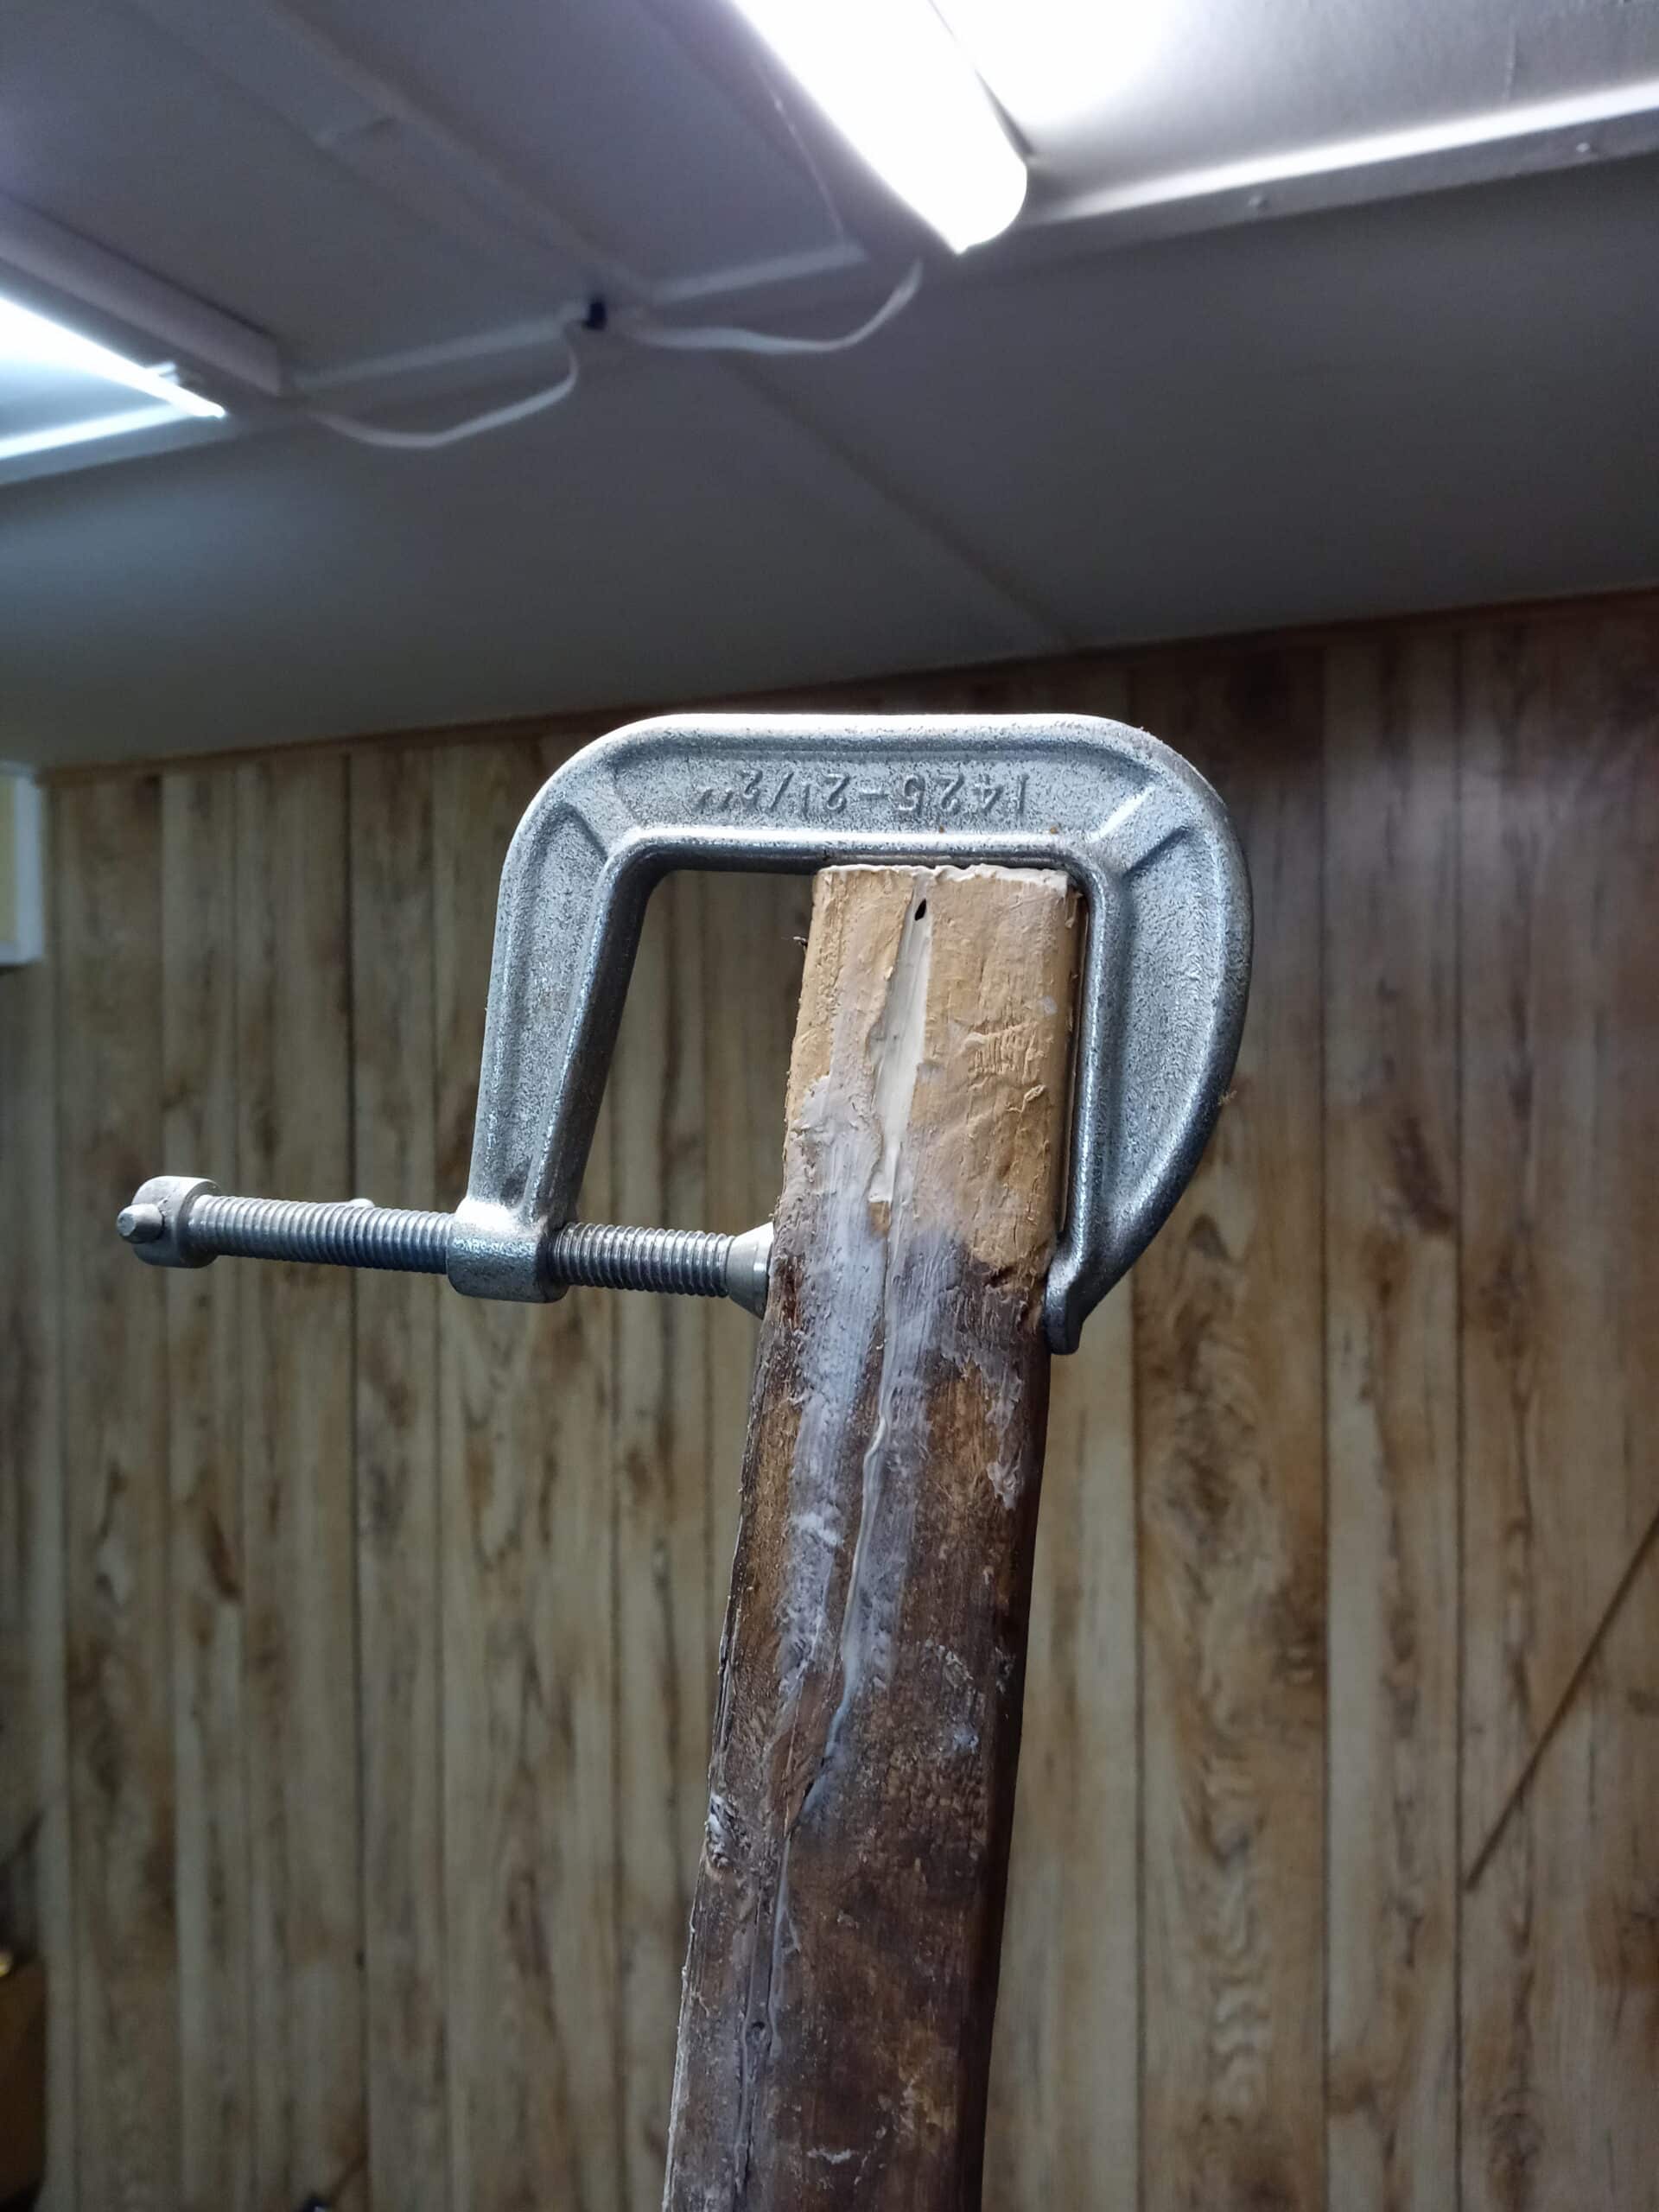
Take your time to avoid splitting or damaging the wood. However, if you do, no worries. Just apply some wood glue and put a clamp on it. Console yourself that a few cracks in the wood gives it a more old and aged look.
Remove all the nails–on the type of box spring shown that included about 40 nails. Fill in all the nail holes and cracks in the wood with painters caulk.
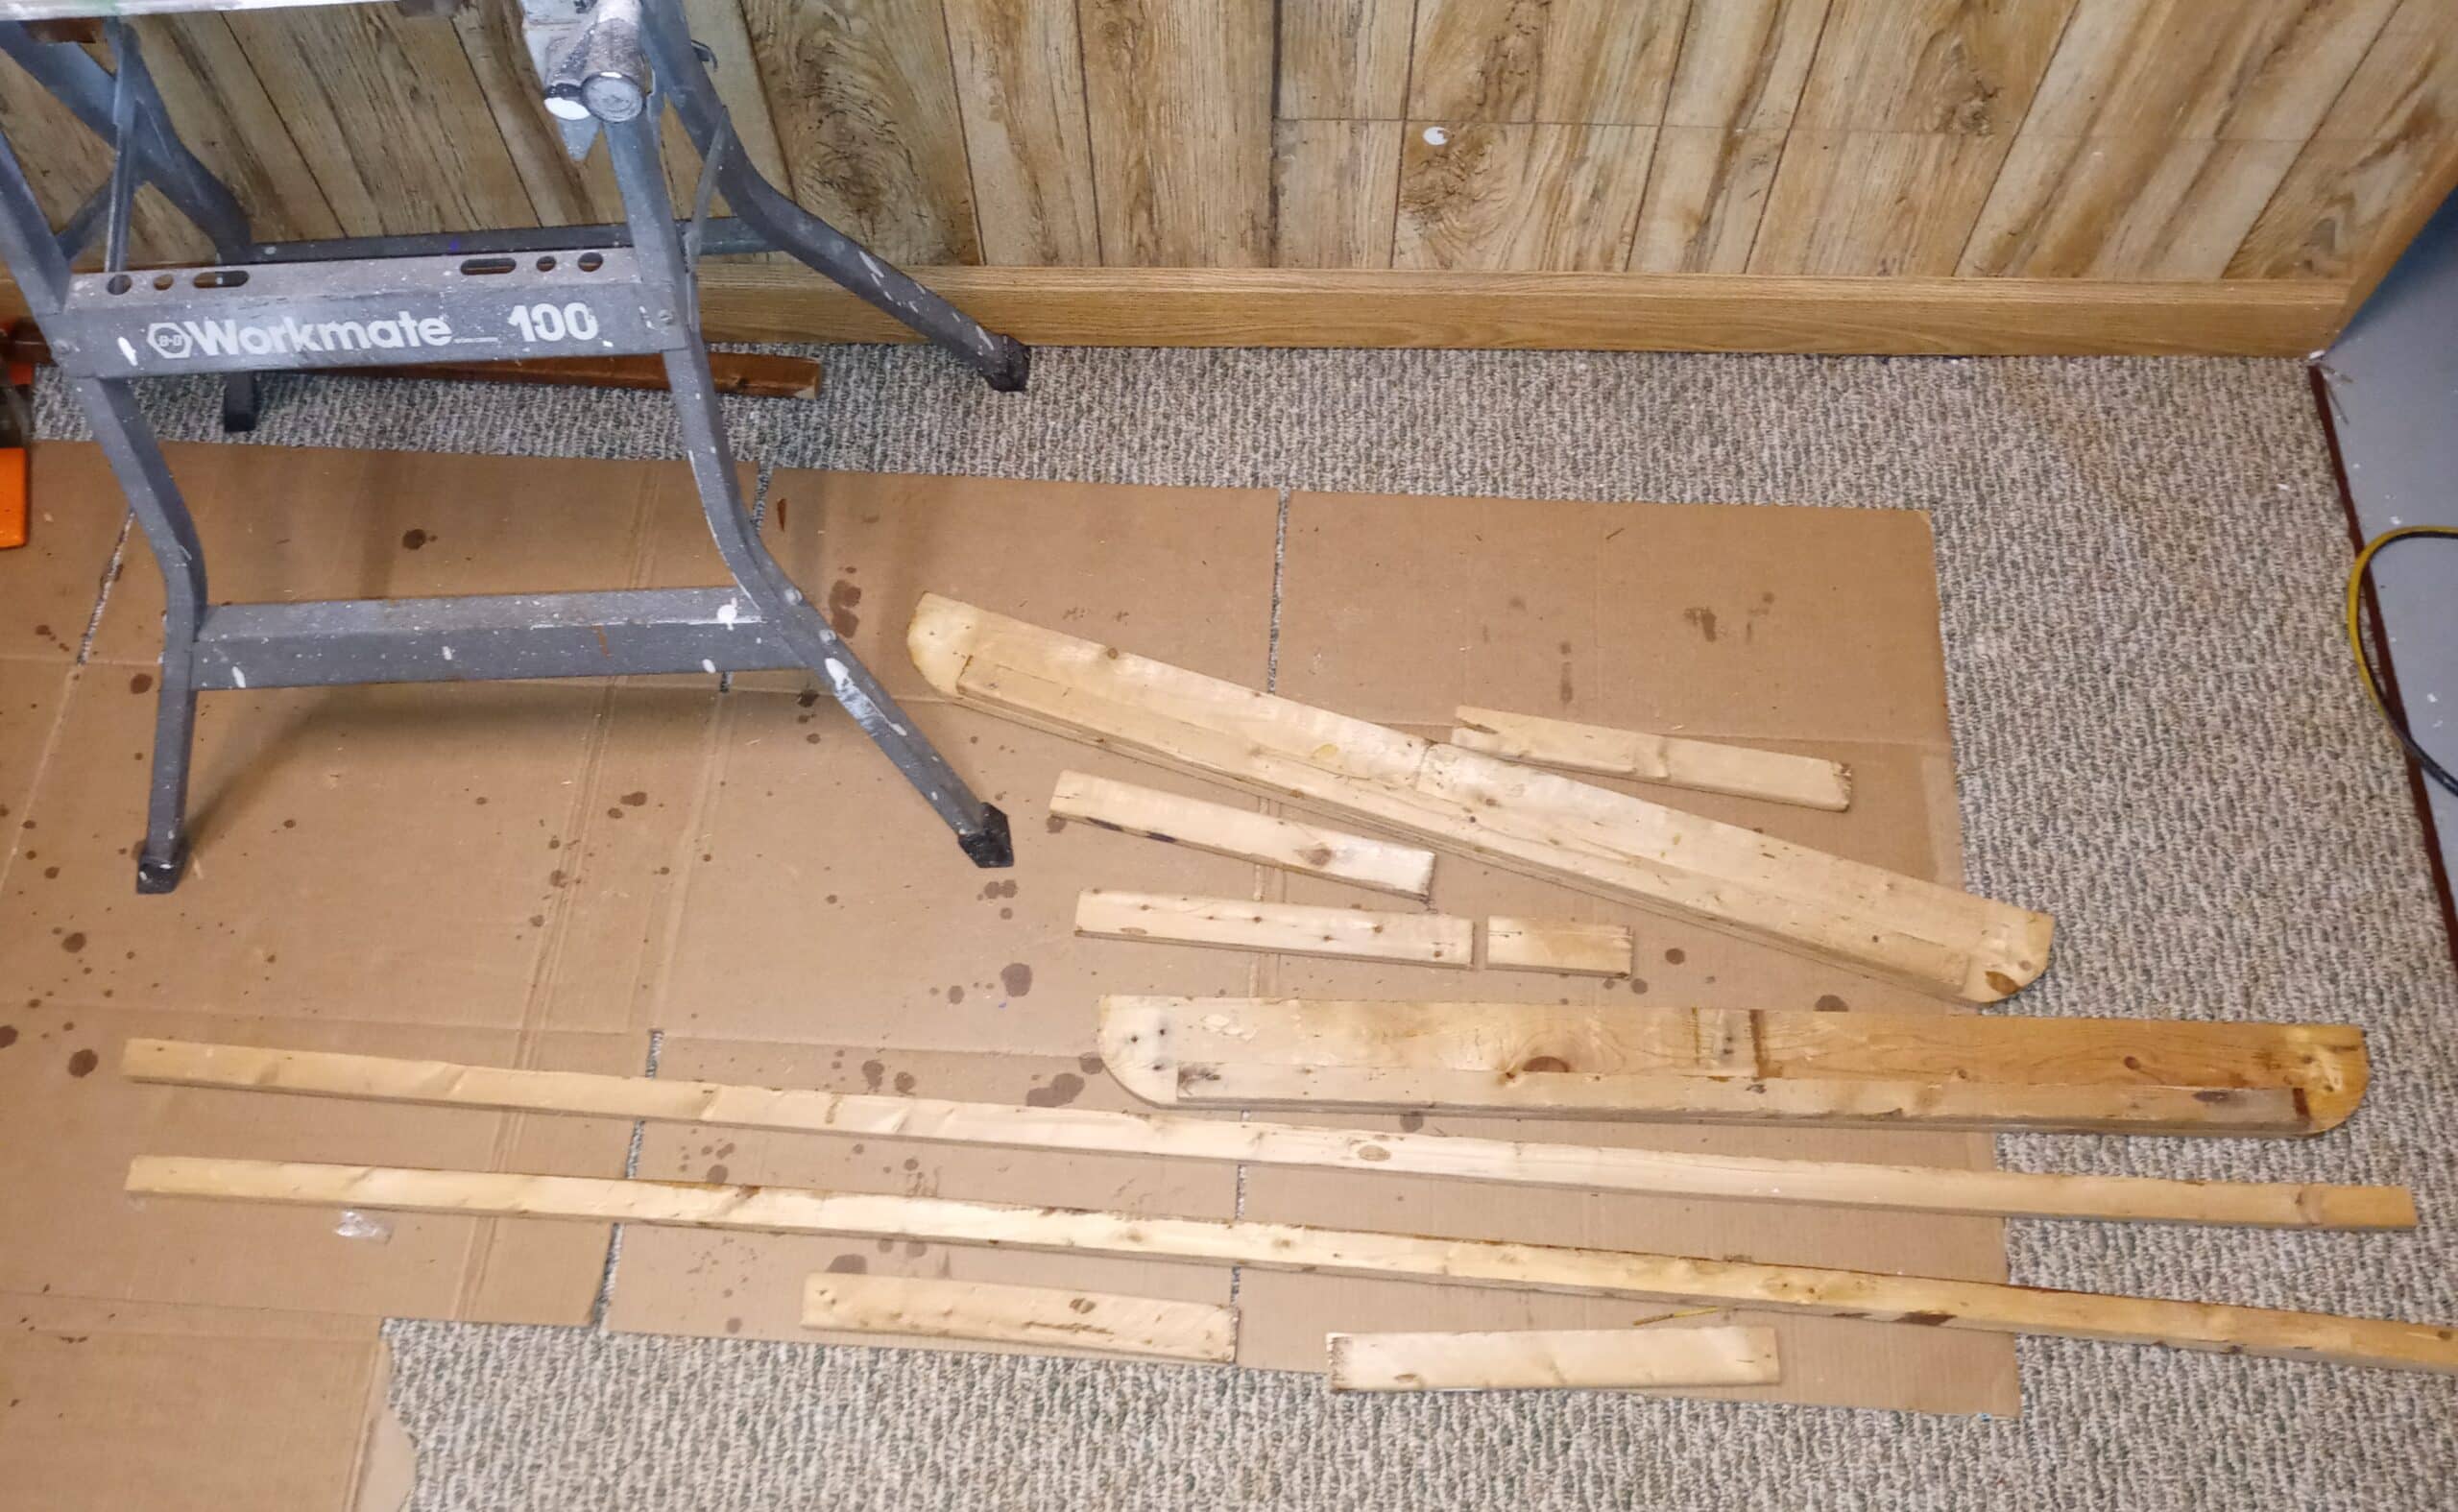
Dimensions of the components:
- (4) legs: 3/4″x 2.5″x 36″
- (9) slats: 3/4″ x1.5″x 22.5″
- (2) top cross braces: 3/4″x1.5″x17″
- (2) middle cross braces: 3/4″x 1.5″x12″
- (2) bottom cross braces: 3/4″x 1.5″x8″
Cut the wood based on the suggested measurements above. After cutting the wood, go over everything again with sandpaper or steel wool and smooth and eliminate any splinters.
When you consider the top and bottom rails cut in half, form a perfect sized X-brace (even with the rounded feet to be flush with the ground!), and that the box spring frame provides all of the wood needed with some pieces to spare, in case something gets ruined, its almost as if this was part of Almighty God’s providential design (without being too obvious about it).
STEP 4: PREPARE AND CONNECT THE “X” LEG PIECES
Place the leg pieces in an “X.” Measure 17 inches from the top edge and drill the hole through each “X.”
Attach with the bolts and nuts. (You could countersink the holes and fill with caulk or use wood dowels to eliminate the anachronistic appearance of bolts on the end.)
STEP 5: PREPARE AND AFFIX THE SLATS
Drill the holes in the X pieces and a fasten with bolt and nuts. Put clamps on it to hold it in place and also help the feet stand on their own. Then arrange the cross piece slats and add duct tape to hold in place.
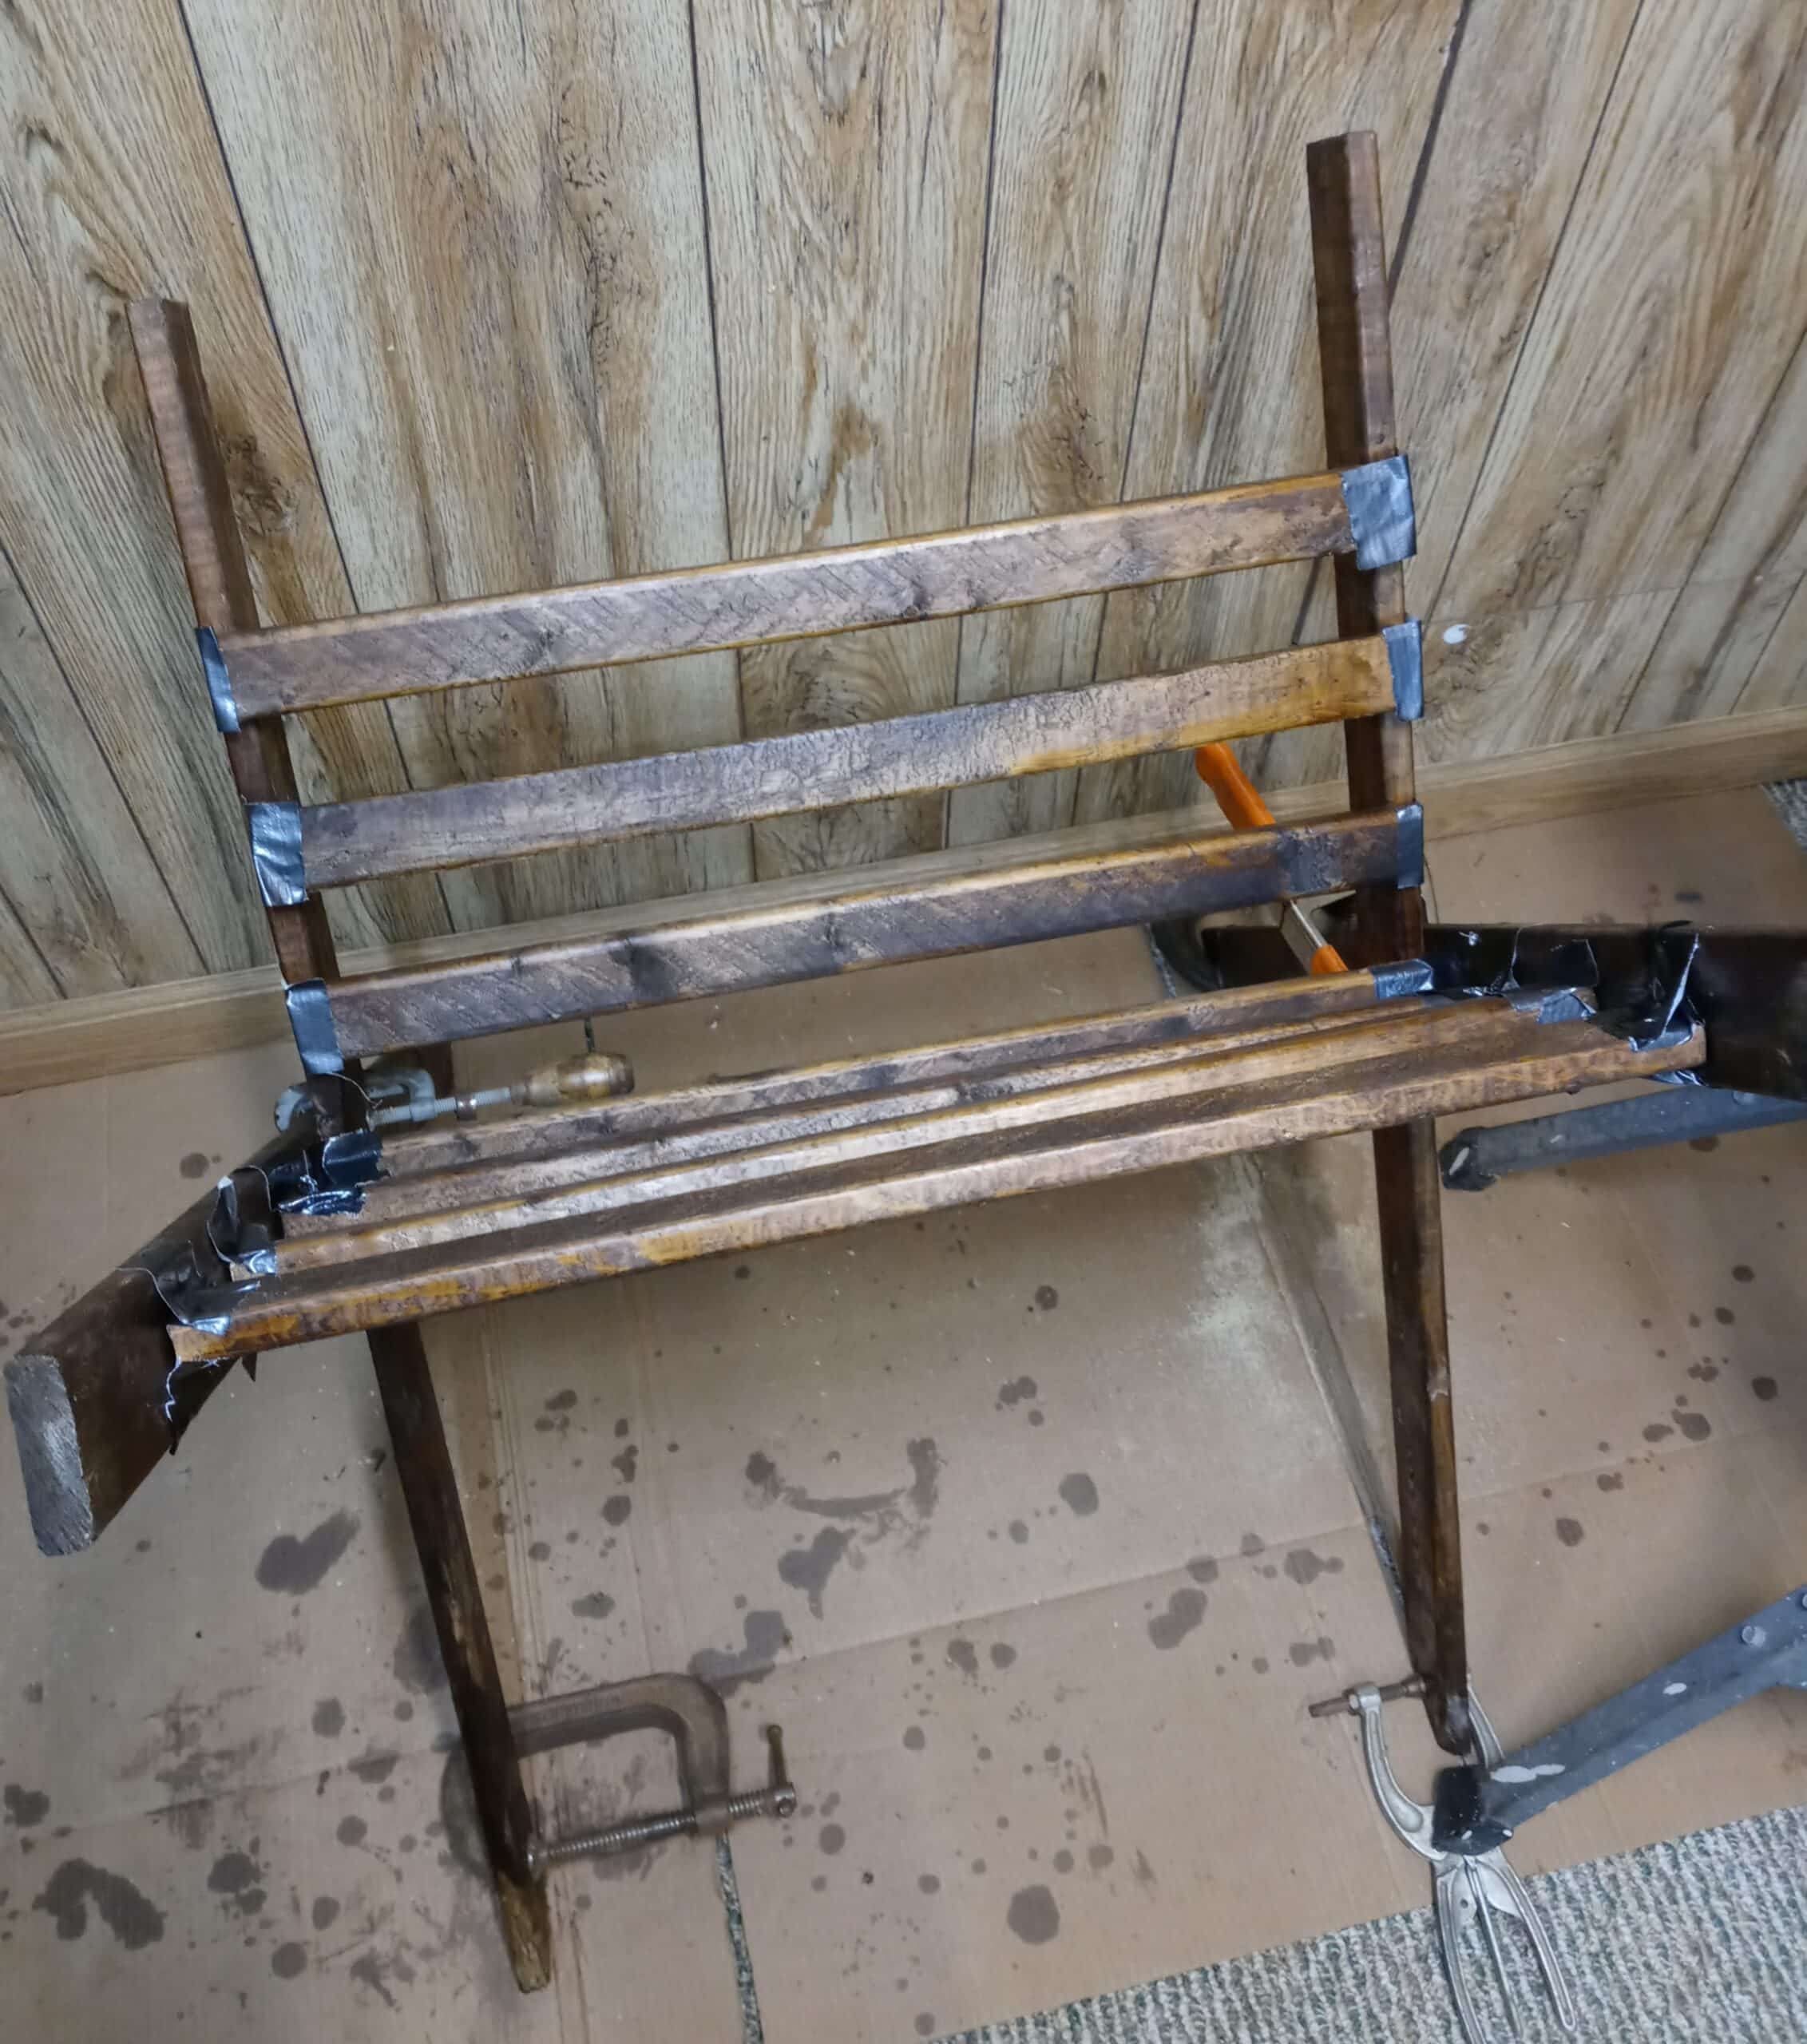
Once you are satisfied with the arrangement, drill pilot holes and then screw them together.
The pilot holes are important because the wood is narrow enough that it might split — and it still might, but that’s okay. As mentioned previously, some cracks will just add to the aged effect.
Then, arrange the side slats. For a more finished look, taper them with the saw to make the bottom edges parallel with the legs. Once it is assembled, you may need to sand or cut one or more of the bottom of the legs to level it. For a more realistic look, sink the bolts and screws flush and cover with caulk so they aren’t visible.
Don’t sweat it if everything doesn’t match up and align perfectly evenly and square. Some imperfection adds to the desired rickety look–the Holy Family didn’t stay in a Five-Star Radisson stable after all!
STEP 6: TOUCH UP AND WEATHERIZE THE WOOD
Touch up the paint and stain as needed. Add caulk to any cracks and the joints between the wood. Brown and black caulk can also be smeared to darken the wood and help simulate aging and a little bit of wood rot. Optionally, add a final coating of a lacquer sealant to protect the wood.
STEP 7: THE FINISHING TOUCHES OF THE CHRISTMAS MANGER PRESENTATION
Put the manger out and add a generous amount of hay or straw. If you are adding a baby Jesus figurine, be sure not to add it until Christmas Eve.
Put one or two spotlights on it unless you are putting it in the middle of a giant Advent wreath or near another source that will light it up.
Another effective possibility is to bury a bright outdoor light inside the straw, to make the straw have a warm glow. Just be sure to select an appropriate bulb and fixture that won’t heat up and catch the straw on fire. That’s not the effect we are looking for!

PUTTING IT AWAY FOR NEXT YEAR
Assuming your manger is displayed outdoors, the straw or hay is likely to have become somewhat soggy with perhaps a little bit of rotting, if the temperatures have stayed above freezing for very long.
Be very careful removing the old straw or hay, especially if you have allergies, asthma or an immune system deficiency, as the fungi that can grow on dusty and damp bedding materials include infectious molds (being exposed to wet hay is one of the occupational risks of farmers who contract so-called “farmer’s lung”).
Removing that small amount of materials outdoors, probably doesn’t represent much exposure risk, but it doesn’t hurt to be cautious anyway.
Store the manger in a garage, shed or basement, unless you feel the need to leave it outdoors somewhere for some additional natural weathering effects!).


- Got Holy Water? Don't Let Your Soul Get Too Dehydrated - April 2, 2026
- St. Joseph: Unleash the Terror of Demons - March 19, 2026
- The Feminine Heart of Catholic France: St. Anne d’Auray, Chartres, and St. Thérèse of Lisieux - March 9, 2026